Adding and Amending Registration Form Fields
This Article will cover how to add or update fields on your streamGo hosted Registration Form. The option to Assign Ticket Types based on a Registration Question Response will also be covered.
Article Contents:
- How to Create Registration Fields
- How to Amend Registration Fields
- How to Assign a Ticket Type using a Registration Field
- 1
- Select Projects in the top navigation. Then click the title of the Project you wish to add a Registration Field to
- 2
-
Expand the Communications menu on the left and click Registration Fields

- 3
-
To add a field click the "+ Create Field" button

- 4
-
You will then be prompted to select a Type, Label, Reference and Values (If the Type is Checkbox or Radio)
Type Definitions:
Text: Single line of text
Number: Single Box to allow Numbers
Radio: Multiple choice where one answer can be selected
Checkbox: Multiple choice where multiple answers can be selected
Select: Dropdown list of multiple choices
TextArea: A larger area to input a text response
Phone Number: Single box allowing the registrant to inout a phone number
Countries: A Dropdown list of Countries
Text Content: An option to add in text content between registration fields
Accept: A single checkbox asking users to accept terms or subscribe
Hidden: An option to add in a hidden field
Ticket Type: Allows a multiple choice option where answers dictate a Ticket Type - 5
- The Label is the text that will appear on the registration form. The Reference is the title of the column in the registration report and should not contain spaces. Values are included when a question gives multiple choices, each possible answer should be entered as its own value using the editor. Finally, you can toggle whether the field is required or not
-

- 6
- Then click "Create Field"
- 7
- You can now reorder the fields by dragging and dropping
How to Create Registration Fields


- 1
- Select Projects in the top navigation. Then click the title of the Project in which you wish to amend a Registration Field
- 2
- Expand the Communications menu on the left and click Registration Fields
- 3
-
Click the pencil icon alongside the Field you wish to amend

- 4
- You will then see the options you can change, per the instructions above
-

- 5
- Click "Update Field"
How to Amend Registration Fields


- 1
- Select Projects in the top navigation. Then click the title of the Project you wish to add a Ticket Type Registration Field to
- 2
- Expand the Communications menu on the left and click Registration Fields
- 3
- Click the "+ Create Field" button
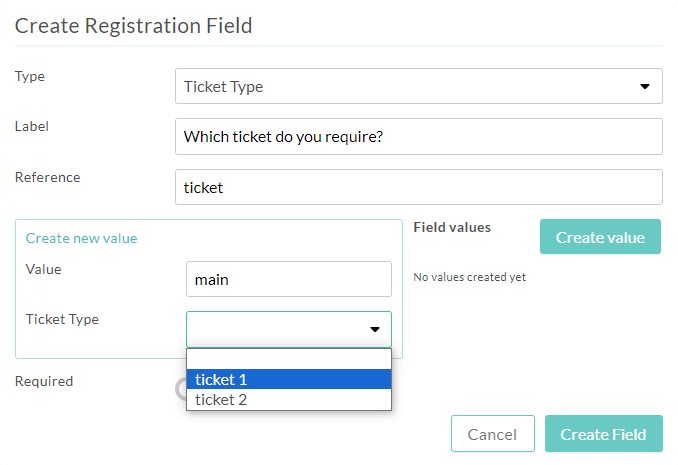
- 4
- In the popup box select "Ticket Type" in the Type list, populate the Label, Reference and Values following the instructions to Create Registration Fields above. Set a value for your ticket to show as and use the drop down to assign the relevant ticket type associated with your project.
How to Assign a Ticket Type using a Registration Field